11. Scenario Analysis
11.1 Introduction
With the Scenario Analysis screen, you can simulate the customer’s Lease request Lease amount, rate and create a mock proposal in Lease with your lending policies.
You can use scenario analysis screen to complete the following tasks:
- View an Existing Scenario Analysis
- Generating Scenario Analysis
- Auto Suggest Pricing for the Scenario Analysis
- Creating an Amortized Schedule for the Scenario Analysis
- Creating an Application from the Scenario Analysis
- Generating a quote from the scenario analysis
Note
Depending on the product licensed, you can view either Loan or Lease Calculator details. If you have licensed both, then you are provided with an option in Scenario Analysis screen to select the required Product Type.
11.1.1 View an Existing Scenario Analysis
You can view a previously generated scenario analysis by inquiring through the identification code.
To view an existing scenario analysis
- Click Origination > Origination > Scenario Analysis. The Scenario Analysis screen is displayed in the main window.
- Select the ‘Product Type’ as either Loan or Lease clicking on the adjacent radio button.
- In the Inquiry Id field, you can either specify the identification code of a previously generated scenario analysis, or select the identification code from the adjacent drop-down list.
- Click Show Details.
11.1.2 Generating Scenario Analysis
To generate a scenario analysis
- Click Origination > Origination > Scenario Analysis. The Scenario Analysis screen is displayed in the main window.
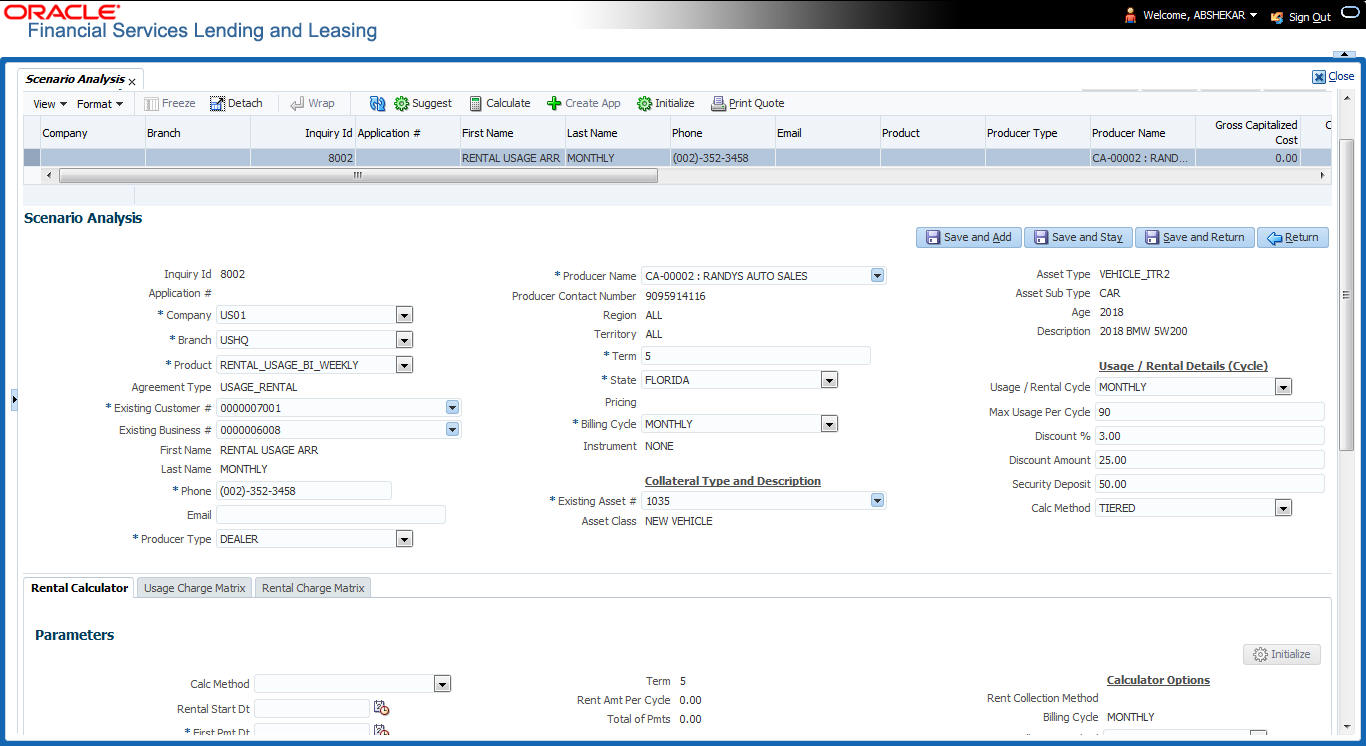
- Click Add and complete the following Parameters. You can click Initialize to clear (or ‘refresh’) the screen details at any time.
Field
Do this:
Inquiry Id
View the inquiry identification code.
Application #
View the application number.
Company
Select the company from the drop-down list.
Branch
Select the branch from the drop-down list.
Product
Select the product from the drop-down list.
Note: If the selected product is of Lease Rental type, additional fields and sections (indicated below) are enabled and some of the fields are displayed in view mode to define Rental Based lease details. For information on such fields, refer to Rental Agreement section in Application Entry chapter.
- Additional fields - Existing Customer # and Existing Business #
- Additional sections - Collateral Type and Description, Usage / Rental Details (Cycle)
Agreement Type
View the agreement type auto populated based on the product selected.
First Name
View/specify the first name.
Last Name
View/specify the last name.
Phone
Specify the phone number of the applicant.
Email
Specify the email address of the applicant.
Producer Type
Select the producer type associated with the product from the drop-down list.
Producer Name
Select the producer associated with the product from the drop-down list.
Producer Contact Number
View the producer contact number.
Region
View the region where the producer belongs.
Territory
View the territory where the producer belongs.
Gross Capitalized Cost
Enter the gross capitalized cost.
Capitalized Cost Reduction
Enter the capitalized cost reduction.
Term
Specify the requested term (number of payments).
State
Select the state code.
Asset Class
View the asset class.
Asset Type
View/select the asset type.
Asset Sub type
View/select the asset sub type.
Make
Specify the make of the vehicle.
Model
Specify the model of the vehicle.
Promotion
Select the requested promotion.
Pricing
View the pricing if applicable.
Billing Cycle
Select the billing cycle schedule.
Instrument
Select the instrument.
- In the Lease Calculator section, you can specify the details of various Parameters, Repayment Options, and Amortization Schedule.
For detailed field information, refer to Lease Calculator section in Tools chapter.
- After you have specified all the required details, click Calculate.The system computes the standard payments with the details specified.
- Perform any of the Basic Actions mentioned in Navigation chapter.
The system auto assigns an identification code to your calculations on the Scenario Analysis screen.
11.1.3 Auto Suggest Pricing for the Scenario Analysis
The Scenario Analysis screen provides an option to calculate and display the Pricing based on previously generated scenario analysis details.
- In the Scenario Analysis section, specify the required information to generate scenario analysis and save the details. (Refer section Generating Scenario Analysis).
- click Suggest. The system displays the Pricing details.
11.1.4 Creating an Amortized Schedule for the Scenario Analysis
You can create the amortized schedule for the selected scenario analysis, The system computes the and displays the amortized schedule under Amortization Schedule tab
To create an amortized schedule for the scenario analysis
- Specify the required information to generate scenario analysis. (Refer section Generating Scenario Analysis)
- Click Amortization Schedule tab and then click Amortize.
The system uses the calculated payment data to complete the Amortization Schedule section and displays the following information:
Field |
View this: |
Seq |
Payment number. |
Pmt Dt |
Payment date. |
Pmt Amt |
Payment amount. |
Principal Amt |
Component of the payment amount allocated towards reduction of the principal balance. |
Interest Amt |
Component of the payment amount allocated towards reduction of the interest balance. |
Balance Amt |
Remaining principal balance. |
11.1.5 Creating an Application from the Scenario Analysis
To create an application from the scenario analysis
- Specify the required information to generate scenario analysis. (Refer section Generating Scenario Analysis)
- Click Create App.
11.1.6 Generating a quote from the scenario analysis
You can generate a summarised report using the calculated details in the format of quote.
After you have specified all the required information to generate scenario analysis, (Refer section Generating Scenario Analysis), click Print Quote.
For detailed information, refer to Printing a Quote section in Tools chapter.
11.2 Viewing Information from Scenario Analysis
The system assigns the information on the Scenario Analysis screen an application number. You can open this application on the Application Entry screen and view information from the Scenario Analysis screen at the following locations:
- The Application screen
- The Request tab
- The Collateral tab
- Underwriting
In the Underwriting screen, the Decision link’s Pricing and Approved sections display the details from the Scenario Analysis screen. You can modify the price chosen in the Scenario Analysis screen and re-price the application. If application has been repriced, the comments regarding the multiple offers on the Comment screen should be manually updated before approving the application.
11.2.1 Subvention Sub Tab
In the Subvention sub tab you can review the subvention information from the application entry and calculate the subvention amount, as well as override the calculated subvention amount. The participant’s information is automatically populated based on the selected subvention plan.
The calculated Subvention details of the application created from Scenario Analysis is populated to Origination > Request > Subvention tab.
To complete the Subvention sub screen
- Click Origination > Origination > Scenario Analysis > Subvention sub tab.
- Perform any of the Basic Operations mentioned in Navigation chapter.
A brief description of the fields is given below:
Field: |
Do this: |
Subvention Plan section: |
|
Plan |
Select the subvention plan. |
Description |
View the subvention plan description. |
Sub Plan Code |
Select the sub plan code from the drop-down list. |
Sub Plan Description |
View the subvention sub plan description. |
Subvention Type |
View the subvention type. |
Include |
Check this box to include this record in calculations on the Other Details sub section |
- Perform any of the Basic Actions mentioned in Navigation chapter.
11.2.2 Compensation Sub Tab
The Compensation (Lease) sub tab records and displays the terms of compensation between the finance company and the dealer for Lease transactions.
Note the following:
- The computations in the Compensation sub tab refers to the 'Requested Amt' in Scenario Analysis tab.
- The 'Buy Rate' is referred from selected ‘Pricing’ definition in Scenario Analysis section.
- The 'Request Rate' is referred from the ‘Rate from' field of selected 'Pricing' definition in Scenario analysis section.
The calculated Compensation details of the application created from Scenario Analysis is populated to Origination > Underwriting >Decision tab.
To complete the Compensation (Lease) sub screen
- Click Origination > Origination > Scenario Analysis > Compensation sub tab. System load the compensation plan details.
Note that, the compensation plan will use application information to calculate compensation.
The system loads the following information on the Compensation sub screen:
Field: |
Do this: |
Compensation section |
|
Compensation Plan |
View the compensation plan. |
Disbursement Method |
View the compensation payment method. |
Calculation Method |
View the compensation calculation method. |
Chargeback section |
|
Paid Calc Method |
View the charge back calculation method (early payoff). |
Paid % |
View the charge back percentage (early payoff). |
Paid Basis |
View the charge back basis (early payoff). |
Paid Term |
View the charge back term (early payoff). |
Paid Days |
View the charge back days (early payoff). |
Chg Off Calc Method |
View the charge back calculation method (charge off). |
Charge Off% |
View the charge back percentage (charge off). |
Chg Off Basis |
View the charge back basis (charge off). |
Chg off Term |
View the charge back term (charge off). |
Chg off Days |
View the charge back days (charge off). |
Calculation section |
|
Spread Formula |
View the compensation spread formula. |
Buy Rate |
View the approved buy rate. |
Buy Rent Factor |
View the compensation buy rent factor. |
Factor |
View the compensation factor. |
Addl Factor |
View the additional compensation factor. |
Max Spread % |
View the maximum spread or percent allowed. |
Max Markup or Percent |
View the maximum compensation Markup. |
Upfront % |
View the upfront compensation percentage. |
Flat Amt |
View the flat amount. |
Upfront Comp Amt |
View the compensation amount paid upfront. |
Rem Comp Amt |
View the compensation amount remaining. |
Comp Amt |
View the compensation amount. |
- Perform any of the Basic Actions mentioned in Navigation chapter.
11.2.3 Rental Calculator
If you are working on Rental based lease type of contract, you can use the Rental Calculator tab to simulate rental billing calculation based on defined cycle. This tab is enabled if you have selected ‘Rental / Usage Rental’ type of product in ‘Scenario Analysis’ section.
To calculate rental / usage rental
- Click Origination > Origination > Scenario Analysis > Rental Calculator sub tab.
- Populate all the required details below and click ‘Initialize’.
A brief description of the fields is given below:
Field: |
Do this: |
Calc Method |
Select the calculation method to be used from the drop-down list. System supports only interest rate type of lease calculation method. |
Rental Start Dt |
Select the rental start date from adjoining calendar. |
First Pmt Dt |
Select the first payment date from the adjoining calendar. |
Rental End Dt |
View the contract end date. |
Term |
View the total number of cycle defined in the contract. |
Rent Amt Per Cycle |
View the rental amount defined for each cycle. |
Total of Pmts |
View the total of payments for entire term. |
Calculator Options |
|
Rent Collection Method |
View the rent collection method applicable. |
Billing Cycle |
View the defined billing cycle. |
Excess Rent Collection Method |
Select the type of method to be used to for excess rent collection (Usage / Rental Matrix) from drop-down list. |
11.2.4 Usage Charge Matrix sub tab
The Usage Charge Matrix sub tab displays the different chargeable slabs defined based on the combination of Billing Cycle and Charge Type. The details maintained here are used for billing calculation based on a particular asset usage.
The information in this tab is auto-populated based on details maintained in Asset Type setup. For more information about field details, refer to ‘Usage Charge Matrix’ section in Setup guides.
11.2.5 Rental Charge Matrix sub tab
The Rental Charge Matrix sub tab displays the different chargeable slabs defined based on the combination of Billing Cycle, Rental Duration, Charge Per Cycle and Charge Type. The details maintained here are used for billing calculation based on a particular asset usage.
The information in this tab is auto-populated based on details maintained in Asset Type setup. For more information about field details, refer to ‘Rental Charge Matrix’ section in Setup guides.